Guia Passo a Passo para Instalar o Typebot em seu servidor próprio

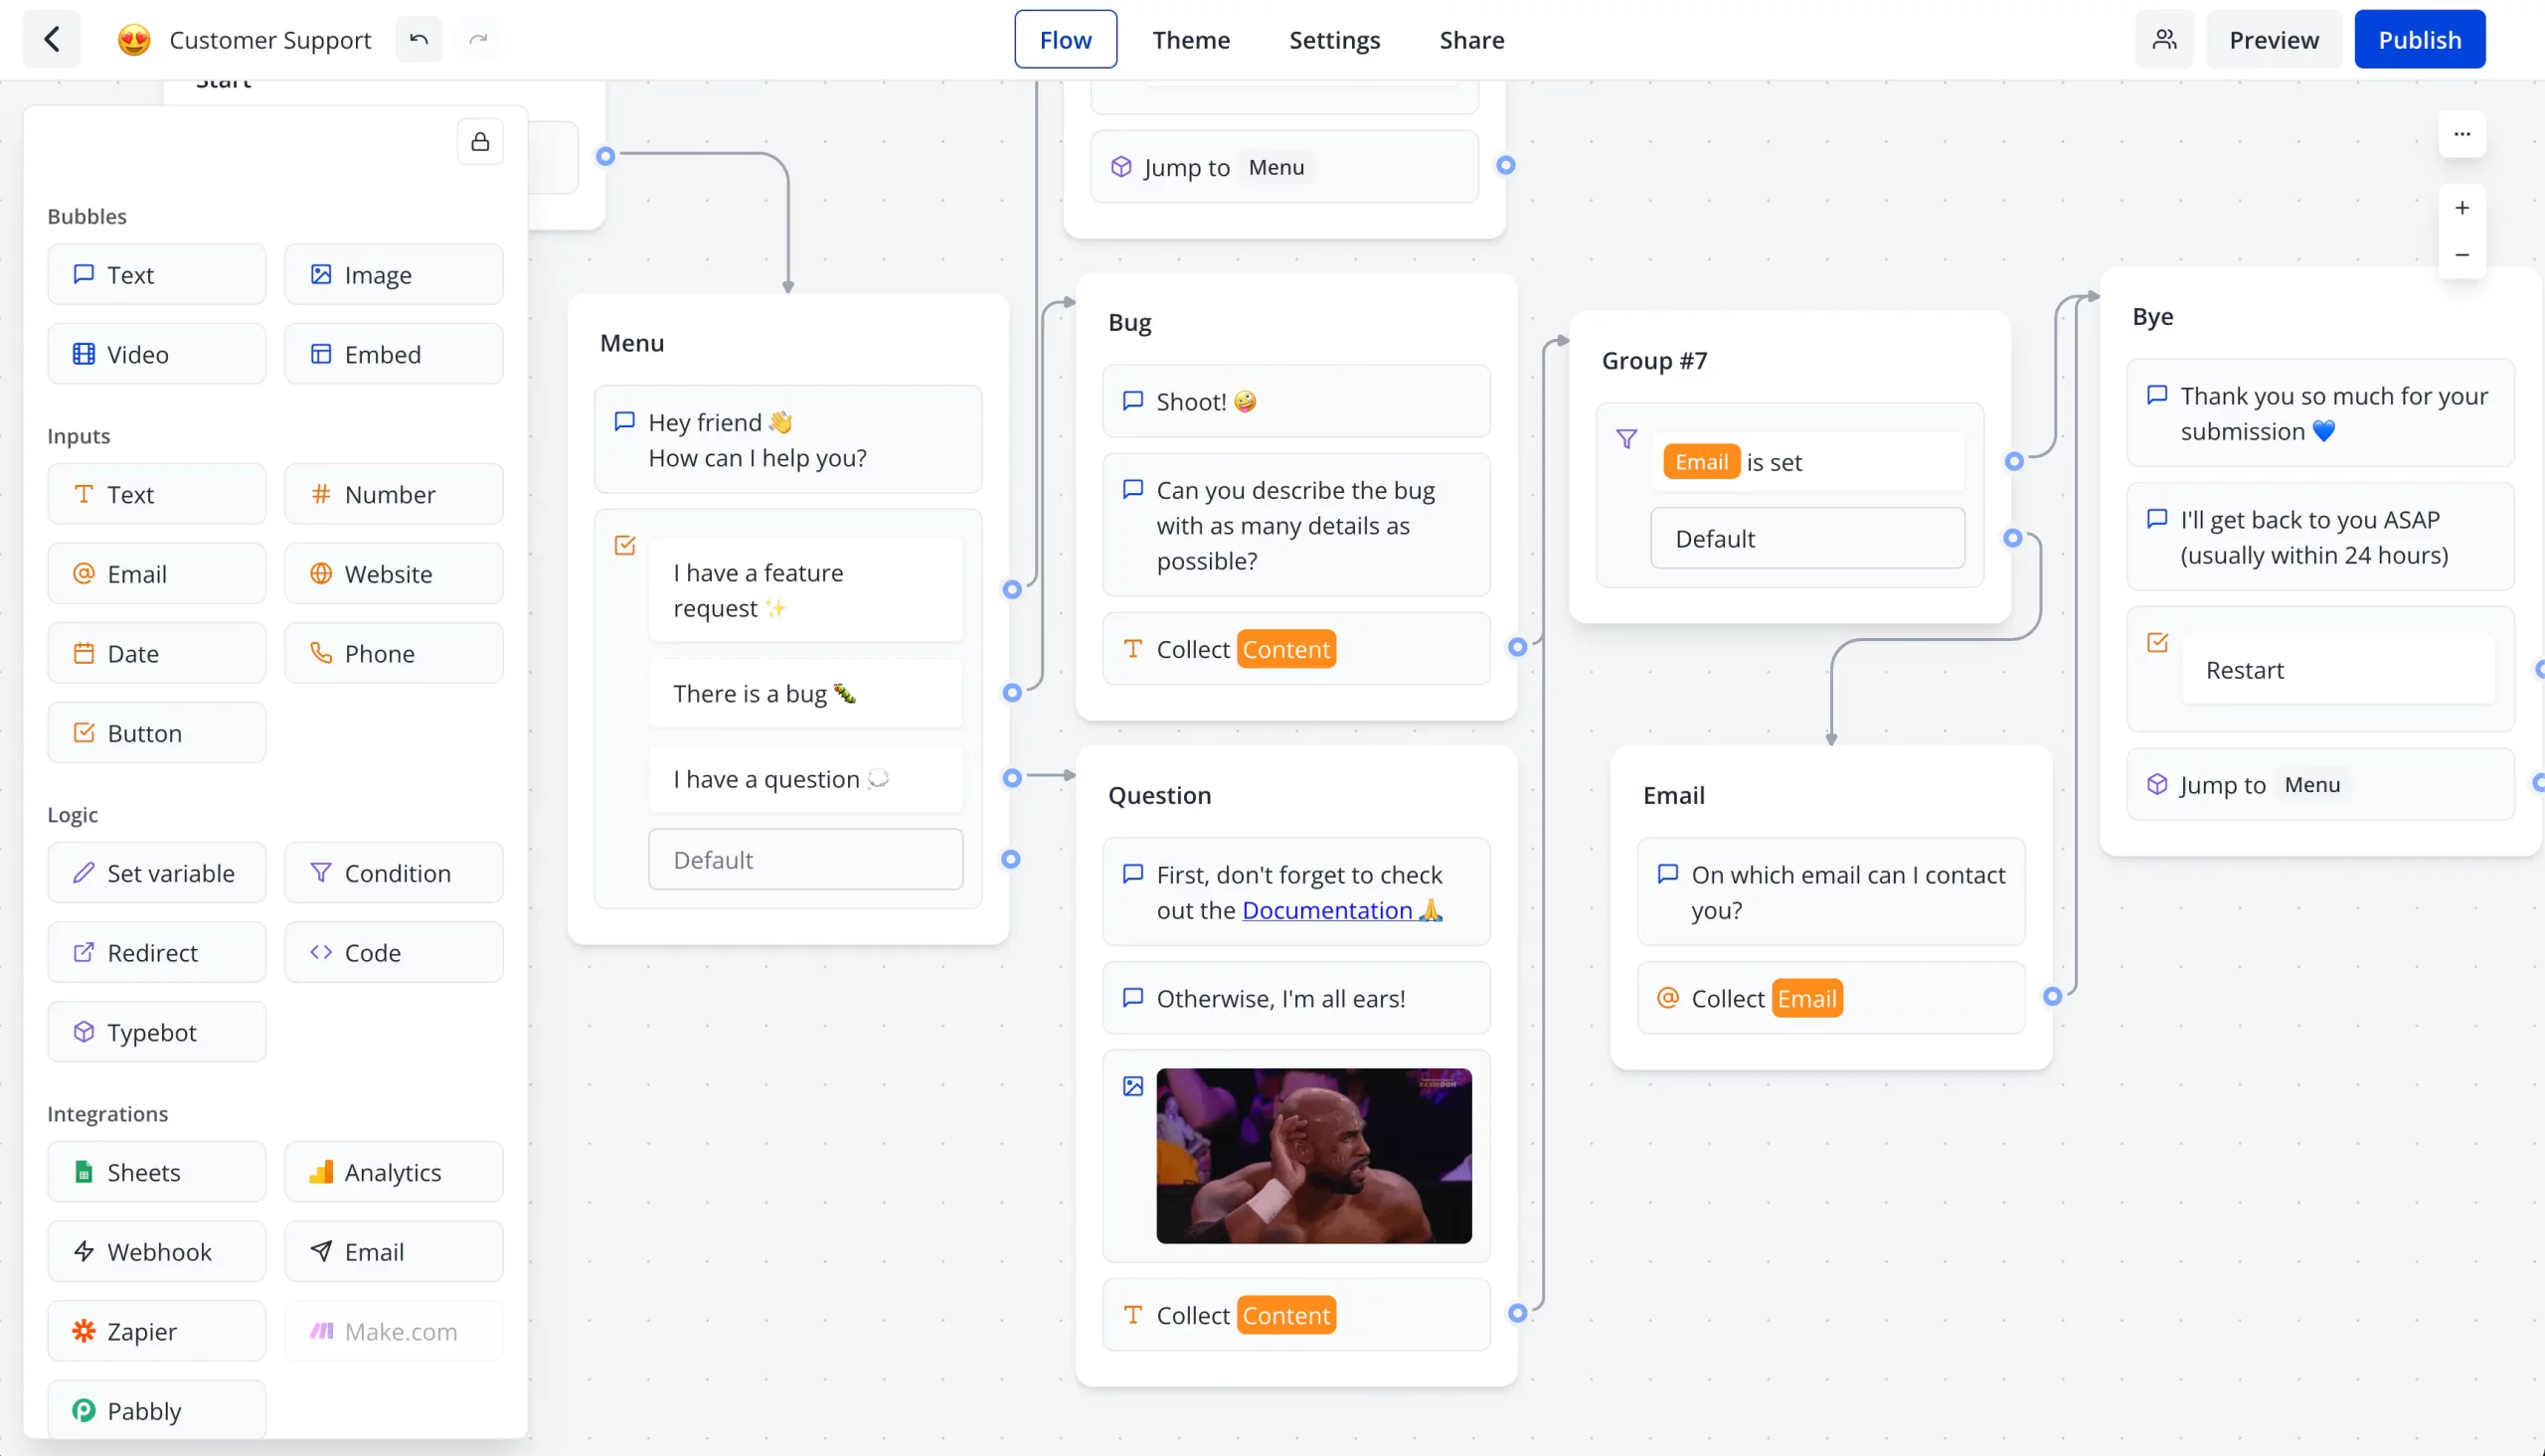
O Typebot é uma ferramenta de código aberto que permite criar aplicativos ou formulários conversacionais de forma simples e eficaz. Ele oferece uma alternativa robusta a outras plataformas como o Landbot. Com o Typebot, você pode criar diferentes tipos de aplicativos conversacionais, como:
– Qualificação de leads
– Lançamento de produtos
– Integração de usuários
– Suporte ao cliente
O Typebot é amado por equipes e criadores em todo o mundo e oferece uma experiência de construção fácil. Você pode arrastar e soltar blocos para criar seu aplicativo e integrá-lo facilmente em qualquer plataforma. Além disso, ele permite coletar resultados em tempo real, o que é uma grande vantagem.

Exemplos de Uso
– Coleta de Informações de Contato: Substitua seus formulários tradicionais por um chatbot que pode coletar nomes, e-mails e outros detalhes de forma interativa.
– Suporte ao Cliente: Use o Typebot para responder automaticamente a perguntas frequentes e fornecer suporte em tempo real.
– Integração de Usuários: Facilite o processo de integração, fornecendo aos novos usuários um guia passo a passo interativo.
– Campanhas de Marketing: Utilize o Typebot em suas landing pages para aumentar as taxas de conversão e engajamento.
– Pesquisas e Feedback: Colete feedback do usuário ou conduza pesquisas de forma mais envolvente e interativa.
Requesitos
Debian 12 bookworm (Instalação Limpa)
DNS
Crie duas entradas em seu DNS exemplo:
– typebot.remontti.cum.br apontando para os IPs do servidor
– typebotapi.remontti.cum.br apontando para os IPs do servidor
Se você já é da turma do blog vai entender o que temos a baixo la no amigo bind9:
typebot       A       192.168.0.100
              AAAA    2001:db8:bebe:cafe::100

typebotapi    A       192.168.0.100
              AAAA    2001:db8:bebe:cafe::100
Atualização e Instalação de Pacotes
# apt update; apt upgrade -y
Instale os pacotes necessários para o projeto
# apt install -y nodejs npm git nginx postgresql postgresql-contrib
Instala globalmente os pacotes pm2 e pnpm usando npm
# npm install -g pm2 pnpm
Configuração do PostgreSQL
Alterne para o usuário postgres
# su - postgres
Crie um novo usuário chamado ‘typebot’ em seguida inserira uma senha.
$ createuser --pwprompt typebot
Crie um novo banco de dados ‘typebot’ e define ‘typebot’ como o proprietário
$ createdb -O typebot typebot
Sai do usuário postgres
$ exit
Preparando formas de autenticação
Vou deixar 3 formas que são as mais fáceis, você pode optar em usar apenas uma.
A mais fácil de todas, basta você utilizar um email, assim toda vez que você for logar ele ira lhe mandar um e-mail com o link.
Crie um novo projeto em https://console.developers.google.com/apis/credentials
Cria um novo projeto
> OAuth consent screen
	> externo
	Nome: Typebot
	User support email: seu!
	Developer contact information: seu!
	 SAVE

	 ADD OR REMOVE SCOPES
	   	.../auth/userinfo.email
	   	.../auth/userinfo.profile
	   	 SAVE

	   	 SAVE

	   	 BACK TO DASH
> Credentials
	+ CREATE CREDENTALS
	  > Create OAuth client ID
		Application type: Web application
		Name: Typebot

		Authorized redirect URIs
		https://typebot.remontti.cum.br/api/auth/callback/google

	Client ID
	Anote

	Client secret
	Anote
Será usado em:
GOOGLE_CLIENT_ID=
GOOGLE_CLIENT_SECRET=
Github
Acesse https://github.com/settings/developers e clique em New OAuth Apps
Application name: Typebot
Homepage URL: https://typebot.remontti.cum.br
Application description: Typebot Auth
Authorization callback URL: https://typebot.remontti.cum.br/api/auth/callback/github
Anote o Client ID e clique em Generate a new client secret anote os dois para ser usado em
GITHUB_CLIENT_ID=
GITHUB_CLIENT_SECRET=
Configuração do Projeto Typebot no Servidor
Vamos armazenar o projeto mo diretório /opt.
# cd /opt/
# git clone https://github.com/baptisteArno/typebot.io.git
Entre no diretório do projeto
cd typebot.io
Crie arquivo .env onde irá ficar as variáveis de ambiente.
# vim /opt/typebot.io/.env
Faça os ajustes:
# Define a chave de criptografia (Gere aqui https://senhasegura.remontti.cum.br/)
ENCRYPTION_SECRET=i9eRecwVJQeKENqdcrQeizOXFHzQdwAp

# Define a URL de conexão com o banco de dados PostgreSQL
DATABASE_URL=postgresql://typebot:minhasupersenha@localhost:5432/typebot

# Define as URLs para autenticação e API
NEXTAUTH_URL=https://typebot.remontti.cum.br
NEXT_PUBLIC_VIEWER_URL=https://typebotapi.remontti.cum.br

# Define o e-mail do administrador
ADMIN_EMAIL=typebot@remontti.cum.br

# Define as configurações para o servidor SMTP
SMTP_USERNAME=typebot@remontti.cum.br
SMTP_PASSWORD=minhasenha
SMTP_HOST=mail.remontti.cum.br
SMTP_PORT=25
NEXT_PUBLIC_SMTP_FROM=typebot@remontti.cum.br
SMTP_SECURE=false
SMTP_AUTH_DISABLED=false

# Configurações para autenticação via Google e GitHub (opcional)
# Google
GOOGLE_CLIENT_ID=98916e5d5dd1-e3lfmixxuditlz2egexp0n8bfwf3oie3.apps.googleusercontent.com
GOOGLE_CLIENT_SECRET=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

# GitHub
GITHUB_CLIENT_ID=6ewyvfeumndg2ve5kve1
GITHUB_CLIENT_SECRET=7r78f2vpmihgriebkp7p4b0ervd4qc7ufu1uu5nx

# Permite ou desabilita o cadastro de novas contas
DISABLE_SIGNUP=false
Instale todas as dependências do projeto
# cd /opt/typebot.io/
# pnpm install
Saída:
Scope: all 19 workspace projects
Lockfile is up to date, resolution step is skipped
Packages: +2398
++++++++++++++++++++++++++++++++++++++++++++++++++++++++++++++++++++++++++++++++++++++++++++++++++++++++++++++++
Downloading registry.npmjs.org/next/13.4.3: 12,32 MB/12,32 MB, done
[...]
[...]
[...]
devDependencies:
+ cross-env 7.0.3
+ cz-emoji 1.3.2-canary.2
+ husky 8.0.3
+ prettier 2.8.8
+ turbo 1.10.12

. prepare$ husky install
│ husky - Git hooks installed
└─ Done in 288ms
Done in 2m 12.5s
Compile os aplicativos
# cd /opt/typebot.io/
# pnpm run build:apps
Saída
> typebot-os@2.17.2 build:apps /root/typebot.io
> turbo run build --filter=builder... --filter=viewer...
[...]
[...]
[...]
[...]
builder:build: ○  (Static)  automatically rendered as static HTML (uses no initial props)
builder:build:

 Tasks:    9 successful, 9 total
Cached:    0 cached, 9 total
  Time:    5m28.928s

⠋ ...writing to cache...  [1s]

─────────┴──────────┴──────────┘
Copie o arquivo .env para os diretórios dos aplicativos
# cp /opt/typebot.io/.env /opt/typebot.io/apps/builder/
# cp /opt/typebot.io/.env /opt/typebot.io/apps/viewer/
Configuração e migrações do banco de dados
# cd /opt/typebot.io/
# pnpm prisma generate && pnpm db:migrate
Saída:
Environment variables loaded from .env
prisma:warn We could not find your Prisma schema at `prisma/schema.prisma`.
If you have a Prisma schema file in a custom path, you will need to run
`prisma generate --schema=./path/to/your/schema.prisma` to generate Prisma Client.
If you do not have a Prisma schema file yet, you can ignore this message.


> typebot-os@2.17.2 db:migrate /opt/typebot.io
> cd packages/prisma && pnpm run db:migrate


> @typebot.io/prisma@0.1.0 db:migrate /opt/typebot.io/packages/prisma
> pnpm migrate:deploy


> @typebot.io/prisma@0.1.0 migrate:deploy /opt/typebot.io/packages/prisma
> dotenv -e ./.env -e ../../.env -- tsx scripts/migrate-deploy.ts

Executing for PostgreSQL schema
┌─────────────────────────────────────────────────────────┐
│  Update available 5.0.0 -> 5.3.1                        │
│  Run the following to update                            │
│    npm i --save-dev prisma@latest                       │
│    npm i @prisma/client@latest                          │
└─────────────────────────────────────────────────────────┘
Inicia os aplicativos com o PM2
# pm2 start --name=typebotwww --cwd /opt/typebot.io/apps/builder/ "pnpm -- next start -p 54001"
# pm2 start --name=typebotapi --cwd /opt/typebot.io/apps/viewer/ "pnpm -- next start -p 54002"
┌────┬───────────────┬─────────────┬─────────┬─────────┬──────────┬────────┬──────┬───────────┬──────────┬──────────┬──────────┬──────────┐
│ id │ name          │ namespace   │ version │ mode    │ pid      │ uptime │ ↺    │ status    │ cpu      │ mem      │ user     │ watching │
├────┼───────────────┼─────────────┼─────────┼─────────┼──────────┼────────┼──────┼───────────┼──────────┼──────────┼──────────┼──────────┤
│ 1  │ typebotapi    │ default     │ N/A     │ fork    │ 819      │ 0s     │ 0    │ online    │ 0%       │ 10.8mb   │ root     │ disabled │
│ 0  │ typebotwww    │ default     │ N/A     │ fork    │ 760      │ 19s    │ 0    │ online    │ 0%       │ 97.2mb   │ root     │ disabled │
└────┴───────────────┴─────────────┴─────────┴─────────┴──────────┴────────┴──────┴───────────┴──────────┴──────────┴──────────┴──────────┘
Salva a configuração atual do PM2 e configura para iniciar com o sistema
# pm2 save
# pm2 startup
Configuração do Nginx
Cria os arquivos de configuração do Nginx para os subdomínios
# vim /etc/nginx/sites-available/typebot.remontti.cum.br.conf
server {
    listen 80;
    listen [::]:80;

    server_name typebot.remontti.cum.br;

    location / {
        proxy_pass http://localhost:54001;
        proxy_set_header Host $host;
    }
}
# vim /etc/nginx/sites-available/typebotapi.remontti.cum.br.conf
server {
    listen 80;
    listen [::]:80;

    server_name typebotapi.remontti.cum.br;

    location / {
        proxy_pass http://localhost:54002;
        proxy_set_header Host $host;
    }
}
Ativa os sites no Nginx
# ln -s /etc/nginx/sites-available/typebot.remontti.cum.br.conf /etc/nginx/sites-enabled/
# ln -s /etc/nginx/sites-available/typebotapi.remontti.cum.br.conf /etc/nginx/sites-enabled/
# rm /etc/nginx/sites-enabled/default
Verifica a sintaxe e reinicia o Nginx
# nginx -t
# systemctl restart nginx
Configuração do Certbot/Let’s Encrypt para HTTPS
Instala o Certbot e o plugin do Nginx
# apt install certbot python3-certbot-nginx
Executa o Certbot para obter os certificados SSL
certbot
Responda:
Saving debug log to /var/log/letsencrypt/letsencrypt.log
Enter email address (used for urgent renewal and security notices)
 (Enter 'c' to cancel): noc@remontti.cum.br

- - - - - - - - - - - - - - - - - - - - - - - - - - - - - - - - - - - - - - - -
Please read the Terms of Service at
https://letsencrypt.org/documents/LE-SA-v1.3-September-21-2022.pdf. You must
agree in order to register with the ACME server. Do you agree?
- - - - - - - - - - - - - - - - - - - - - - - - - - - - - - - - - - - - - - - -
(Y)es/(N)o: Y <<<<<

- - - - - - - - - - - - - - - - - - - - - - - - - - - - - - - - - - - - - - - -
Would you be willing, once your first certificate is successfully issued, to
share your email address with the Electronic Frontier Foundation, a founding
partner of the Let's Encrypt project and the non-profit organization that
develops Certbot? We'd like to send you email about our work encrypting the web,
EFF news, campaigns, and ways to support digital freedom.
- - - - - - - - - - - - - - - - - - - - - - - - - - - - - - - - - - - - - - - -
(Y)es/(N)o: N <<<<
Account registered.

Which names would you like to activate HTTPS for?
We recommend selecting either all domains, or all domains in a VirtualHost/server block.
- - - - - - - - - - - - - - - - - - - - - - - - - - - - - - - - - - - - - - - -
1: typebotapi.remontti.cum.br
2: typebot.remontti.cum.br
- - - - - - - - - - - - - - - - - - - - - - - - - - - - - - - - - - - - - - - -
Select the appropriate numbers separated by commas and/or spaces, or leave input
blank to select all options shown (Enter 'c' to cancel):  <<<<
Requesting a certificate for typebotapi.remontti.cum.br and typebot.remontti.cum.br

Successfully received certificate.
Certificate is saved at: /etc/letsencrypt/live/typebotapi.remontti.cum.br/fullchain.pem
Key is saved at:         /etc/letsencrypt/live/typebotapi.remontti.cum.br/privkey.pem
This certificate expires on 2023-12-20.
These files will be updated when the certificate renews.
Certbot has set up a scheduled task to automatically renew this certificate in the background.

Deploying certificate
Successfully deployed certificate for typebotapi.remontti.cum.br to /etc/nginx/sites-enabled/typebotapi.remontti.cum.br.conf
Successfully deployed certificate for typebot.remontti.cum.br to /etc/nginx/sites-enabled/typebot.remontti.cum.br.conf
Congratulations! You have successfully enabled HTTPS on https://typebotapi.remontti.cum.br and https://typebot.remontti.cum.br

- - - - - - - - - - - - - - - - - - - - - - - - - - - - - - - - - - - - - - - -
If you like Certbot, please consider supporting our work by:
 * Donating to ISRG / Let's Encrypt:   https://letsencrypt.org/donate
 * Donating to EFF:                    https://eff.org/donate-le
- - - - - - - - - - - - - - - - - - - - - - - - - - - - - - - - - - - - - - - -
Configuração do Cron para Renovação Automática do Certificado SSL.
Adicione uma tarefa cron para renovar automaticamente o certificado SSL todo dia 1 de cada mês à meia-noite, e reinicie o cron.
# echo '00 00   1 * *   root    /usr/bin/certbot renew -q' >> /etc/crontab
# systemctl restart cron.service
Acessando a aplicação
Abra seu navegador e acesse: https://typebot.remontti.cum.br

Clique em Registre-se gratuitamente
Escolha a forma desejada.
❗️❗️❗️
Os registros ficam aberto, então registre toda sua equipe e em seguida desativa a possibilidade de novos registros nos arquivos .env (DISABLE_SIGNUP=true)
Com o comando sed
# sed -i 's/DISABLE_SIGNUP=false/DISABLE_SIGNUP=true/' /opt/typebot.io/.env
# sed -i 's/DISABLE_SIGNUP=false/DISABLE_SIGNUP=true/' /opt/typebot.io/apps/viewer/.env
# sed -i 's/DISABLE_SIGNUP=false/DISABLE_SIGNUP=true/' /opt/typebot.io/apps/builder/.env
Reinicie o pm2
# systemctl restart pm2-root.service
Se deseja realizar novos cadastros basta alterar DISABLE_SIGNUP=true para DISABLE_SIGNUP=false e reiniciar novamente.
# sed -i 's/DISABLE_SIGNUP=true/DISABLE_SIGNUP=false/' /opt/typebot.io/.env
# sed -i 's/DISABLE_SIGNUP=true/DISABLE_SIGNUP=false/' /opt/typebot.io/apps/viewer/.env
# sed -i 's/DISABLE_SIGNUP=true/DISABLE_SIGNUP=false/' /opt/typebot.io/apps/builder/.env
Reinicie o pm2
# systemctl restart pm2-root.service
Se desejar fazer alterações faça os arquivos:
/opt/typebot.io/.env
/opt/typebot.io/apps/viewer/.env
/opt/typebot.io/apps/builder/.env

A parte mais complicada está feita!
Existe vários videos no YouTube sobre como mexer nessa criança. Inclusive no canal oficial dos desenvolvedores. Dica ative a legenda e selecione traduzir!
Gostou e quer me ajudar manter o blog sem a inconveniência de anúncios intrusivos ou a imposição de taxas? 🙂
Se quiser fazer uma doação para o café ficarei muito feliz pelo seu reconhecimento!

Se não puder doar pode deixar seu agradecimento nos comentário também ficarei feliz em saber que ajudei. Se tiver qualquer pergunta deixe-a também. Se preferir entrar em Contato clique aqui.
Abraço!
Fonte:
https://docs.typebot.io/


Caso estiver instalando e ocorrer o erro
WARN The “workspaces” field in package.json is not supported by pnpm. Create a “pnpm-workspace.yaml” file instead.
ERROR This project is configured to use bun
após rodar o pnpm install
corrigi o problema fazendo o seguinte:
apt install curl unzip -y
source /root/.bashrc
curl -fsSL https://bun.sh/install | bash
bun install
# a Saida deve ser assim:
[0.18ms] “.env”
bun install v1.2.5 (013fdddc)
$ turbo run db:generate
Attention:
Turborepo now collects completely anonymous telemetry regarding usage.
This information is used to shape the Turborepo roadmap and prioritize features.
You can learn more, including how to opt-out if you’d not like to participate in this anonymous program, by visiting the following URL:
https://turbo.build/repo/docs/telemetry
turbo 2.3.4
• Packages in scope: @typebot.io/ai, @typebot.io/anthropic-block, @typebot.io/billing, @typebot.io/blocks-base, @typebot.io/blocks-bubbles, @typebot.io/blocks-core, @typebot.io/blocks-inputs, @typebot.io/blocks-integrations, @typebot.io/blocks-logic, @typebot.io/bot-engine, @typebot.io/cal-com-block, @typebot.io/chat-node-block, @typebot.io/chat-session, @typebot.io/conditions, @typebot.io/credentials, @typebot.io/deepseek-block, @typebot.io/dify-ai-block, @typebot.io/elevenlabs-block, @typebot.io/emails, @typebot.io/env, @typebot.io/events, @typebot.io/forge, @typebot.io/forge-repository, @typebot.io/groq-block, @typebot.io/groups, @typebot.io/js, @typebot.io/legacy, @typebot.io/lib, @typebot.io/logs, @typebot.io/mistral-block, @typebot.io/nextjs, @typebot.io/nocodb-block, @typebot.io/open-router-block, @typebot.io/openai-block, @typebot.io/partykit, @typebot.io/perplexity-block, @typebot.io/playwright, @typebot.io/posthog-block, @typebot.io/prisma, @typebot.io/qrcode-block, @typebot.io/radar, @typebot.io/react, @typebot.io/results, @typebot.io/rich-text, @typebot.io/runtime-session-store, @typebot.io/schemas, @typebot.io/scripts, @typebot.io/segment-block, @typebot.io/settings, @typebot.io/telemetry, @typebot.io/theme, @typebot.io/together-ai-block, @typebot.io/transactional, @typebot.io/trpc-openapi, @typebot.io/tsconfig, @typebot.io/typebot, @typebot.io/ui, @typebot.io/variables, @typebot.io/whatsapp, @typebot.io/wordpress, @typebot.io/workspaces, @typebot.io/zendesk-block, @typebot.io/zod, bot-engine, builder, docs, forge-cli, landing-page, stories, typebot-js, viewer
• Running db:generate in 71 packages
• Remote caching disabled
@typebot.io/prisma:db:generate: cache bypass, force executing 96956da5c23aae7d
@typebot.io/prisma:db:generate:
@typebot.io/prisma:db:generate: $ dotenv -e ./.env -e ../../.env — tsx scripts/db-generate.ts
@typebot.io/prisma:db:generate: Executing for PostgreSQL schema
@typebot.io/prisma:db:generate: Prisma schema loaded from postgresql/schema.prisma
@typebot.io/prisma:db:generate:
@typebot.io/prisma:db:generate: ✔ Generated Prisma Client (v5.12.1) to ./../../node_modules/@prisma/client in 1.54s
@typebot.io/prisma:db:generate:
@typebot.io/prisma:db:generate: Start using Prisma Client in Node.js (See: https://pris.ly/d/client)
@typebot.io/prisma:db:generate: “`
@typebot.io/prisma:db:generate: import { PrismaClient } from ‘@prisma/client’
@typebot.io/prisma:db:generate: const prisma = new PrismaClient()
@typebot.io/prisma:db:generate: “`
@typebot.io/prisma:db:generate: or start using Prisma Client at the edge (See: https://pris.ly/d/accelerate)
@typebot.io/prisma:db:generate: “`
@typebot.io/prisma:db:generate: import { PrismaClient } from ‘@prisma/client/edge’
@typebot.io/prisma:db:generate: const prisma = new PrismaClient()
@typebot.io/prisma:db:generate: “`
@typebot.io/prisma:db:generate:
@typebot.io/prisma:db:generate: See other ways of importing Prisma Client: http://pris.ly/d/importing-client
@typebot.io/prisma:db:generate:
@typebot.io/prisma:db:generate: ┌────────────────────────────────────────────────────────────────┐
@typebot.io/prisma:db:generate: │ Supercharge your Prisma Client with global database caching, │
@typebot.io/prisma:db:generate: │ scalable connection pooling and real-time database events. │
@typebot.io/prisma:db:generate: │ Explore Prisma Accelerate: https://pris.ly/cli/-accelerate │
@typebot.io/prisma:db:generate: │ Explore Prisma Pulse: https://pris.ly/cli/-pulse │
@typebot.io/prisma:db:generate: └────────────────────────────────────────────────────────────────┘
@typebot.io/prisma:db:generate:
@typebot.io/prisma:db:generate:
Tasks: 1 successful, 1 total
Cached: 0 cached, 1 total
Time: 10.278s
$ husky
+ @biomejs/biome@1.9.4
+ @tolgee/cli@2.8.2
+ husky@9.1.7
+ sherif@1.1.1
+ turbo@2.3.4
+ typescript@5.7.3
2676 packages installed [33.84s]
Blocked 4 postinstalls. Run `bun pm untrusted` for details.
Ola poderia me ajudar.. o meu aparece varias tentativas tente mais tarde,
Olha demorei um pouco para configurar todo o ambiente de acordo com o SCRIPT e como sou desenvolvedor também, já sei que é assim mesmo em alguns casos nem funciona, mas o seu SCRITP e a forma limpa como descreveu tudo se seguir na risca, dá tudo certo, como deu pra mim aqui, quero parabenizar pelo excelente trabalho e iniciativa de compartilhar com todos, grande abraço !!! Obs. seu botão de doação não está ativo !!!
https://blog.remontti.com.br/doar ( nesse atalho colocou .cum.br
Boa noite! Segue o passo a passo e deu tudo certo estou apenas com um problema para fazer o login. Não consegue fazer login nem pelo Github nem pelo Google, sempre retorna erro. Sabem o que pode ser?
certamente a senha que você colocou no postegres esta com algum caracter. aconteceu comigo.
volta, de um “dropdb typebot” depois “dropuser typebot” e faça novamente
HELP ME PLEASE AFTER execute
pnpm prisma generate && pnpm db:migrate
prisma:warn We could not find your Prisma schema at `prisma/schema.prisma`.
If you have a Prisma schema file in a custom path, you will need to run
`prisma generate –schema=./path/to/your/schema.prisma` to generate Prisma Clien t.
If you do not have a Prisma schema file yet, you can ignore this message.
> typebot-os@2.20.0 db:migrate /opt/typebot.io
> cd packages/prisma && pnpm run db:migrate
> @typebot.io/prisma@0.1.0 db:migrate /opt/typebot.io/packages/prisma
> pnpm migrate:deploy
> @typebot.io/prisma@0.1.0 migrate:deploy /opt/typebot.io/packages/prisma
> dotenv -e ./.env -e ../../.env — tsx scripts/migrate-deploy.ts
(node:3288) ExperimentalWarning: `–experimental-loader` may be removed in the future; instead use `register()`:
–import ‘data:text/javascript,import { register } from “node:module”; import { pathToFileURL } from “node:url”; register(“file%3A///opt/typebot.io/node_modules/.pnpm/tsx%403.12.7/node_modules/tsx/dist/loader.js”, pathToFileURL(“./”));’
(Use `node –trace-warnings …` to show where the warning was created)
(node:3288) ExperimentalWarning: `globalPreload` is planned for removal in favor of `initialize`. `globalPreload` is an experimental feature and might change at any time
(Use `node –trace-warnings …` to show where the warning was created)
Executing for PostgreSQL schema
Command failed: prisma migrate deploy –schema postgresql/schema.prisma
Error: P3009
migrate found failed migrations in the target database, new migrations will not be applied. Read more about how to resolve migration issues in a production database: https://pris.ly/d/migrate-resolve
The `20231211122755_add_banned_ip_table` migration started at 2023-12-18 20:18:16.407601 UTC failed
pnpm prisma generate && pnpm db:migrate
Problema base de datos me puede ayudar por favor
Script furado. Da erro na hora de migração do banco. Enviei mensagem do erro e excluíram ao invés de responde-la.
Dá erro na hora de migração do banco. Script furado! Postei mensagem sobre o erro e excluíram ao invés de responder.
Funcionando perfeitamente, poderia trazer um conteudo de como configurar com mínio?
Estou com o seguinte erro ao executar “pnpm prisma generate && pnpm db:migrate”, alguma pista?
Environment variables loaded from .env
prisma:warn We could not find your Prisma schema at `prisma/schema.prisma`.
If you have a Prisma schema file in a custom path, you will need to run
`prisma generate –schema=./path/to/your/schema.prisma` to generate Prisma Client.
If you do not have a Prisma schema file yet, you can ignore this message.
> typebot-os@2.19.1 db:migrate /opt/typebot.io
> cd packages/prisma && pnpm run db:migrate
> @typebot.io/prisma@0.1.0 db:migrate /opt/typebot.io/packages/prisma
> pnpm migrate:deploy
> @typebot.io/prisma@0.1.0 migrate:deploy /opt/typebot.io/packages/prisma
> dotenv -e ./.env -e ../../.env — tsx scripts/migrate-deploy.ts
Executing for PostgreSQL schema
Command failed: prisma migrate deploy –schema postgresql/schema.prisma
Error: P3009
migrate found failed migrations in the target database, new migrations will not be applied. Read more about how to resolve migration issues in a production database: https://pris.ly/d/migrate-resolve
The `20220603074700_add_tokens` migration started at 2023-11-27 20:58:12.630154 UTC failed
Instalando V2.18.4, mas tive problemas, na hora de logar a primeira vez da á seguinte mensagem:
Não autorizado
As inscrições estão desativadas.
Porém DISABLE_SIGNUP está como true
DISABLE_SIGNUP=true
Boa noite a todos, excelente conteúdo, funcionando quase 100% ná hora de upar imagens não vai de jeito nenhum e nem apresenta erros.
Alguém já se deparou com isso?
não faz upload das imagens porque não foi configurado o servidor de imagem
O mestre dos mestres!
Como sempre passo a passo sensacional, obrigado Rudimar!!!!